Color Logo Tutorial
Courtesy DISC Imaging - Public Domain
|
Ok, this a guide to creating a in-game Color logo, using
Walley 1.53b (download Wally 1.53b - 356Kb).
Note: This tutorial was designed with the
MOD version of Counter-Strike in mind, not the Retail Stand-Alone version. Owners
of the retail version may have to do some things slighty differently.
|
Ok first things first. Get any color image (something you
made in Photoshop, Paintshop, or D-Loaded) and make sure it is exactly
one of these dimensions (Dimensions are in pixels): 256x32,
32x256, 128x64, 64x128, or 96x96. If your image
is not one of these sizes, resize the image so that is the correct size. This
step is critical, files of unacceptable dimensions will not work with CS and will
be rejected by the Walley program.
If the image is the correct size, run Wally and open the Half-Life Decal
Wizard from Wally's Wizard menu (see fig. 1).
Fig. 1

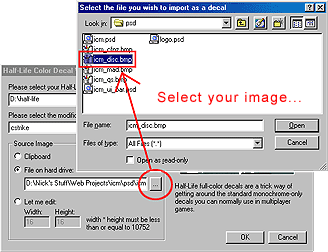
In the Half-Life Decal Wizard (see example in fig.
2) you will need to indicated where HL is installed and which MOD you want the
logo installed on. With that those fields filled, check the file on hard drive
box/dot and click the browse button (circled in fig. 2)
Fig. 2

...and in the browse dialog (fig. 3) tell Wally where the your source image
is. Once you've located it, select the file press the Open button,
to close the browse diaglog and open image in the Half-Life Decal Wizard.
Fig. 3

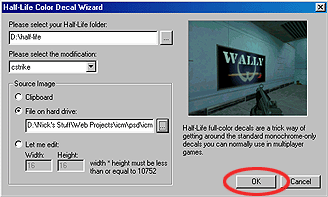
When you are returned to the Half-Life Decal Wizard (shown in fig. 4)
press the ok button (circled in fig. 4). If you get an error message, telling
you that image is the wrong size, you are a dipsh*t for not following my earlier
advice.
Fig. 4

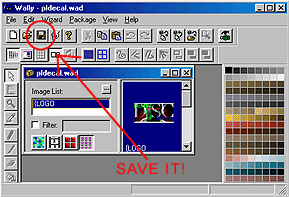
Your new logo should be visable in the main window now (see
Fig. 5 below). Save it by clicking on the disk icon in the Walley tool bar, or
selecting save from the file menu.
Fig. 5

|
Usage Warning:
1. Do not goto the Half-Life customize menu, or you will erase the logo and have to start over again! 2. It takes the game server a moment to load your logo and some servers do not allow custom logos (e.g. HomeLAN Allience Servers). |
-Fin-

Insane Clown Mercenaries (a.k.a. Clan IcM) 2003, All rights reserved.
Produced in part by DISC Imaging Systems 2003.
Produced in part by DISC Imaging Systems 2003.
<< Back to the Top | Main Page >>
